
RE POST: Best of POLO+10 History
Text and Photos: POLO+10 / Vicky Fenner, 13th August 2014
A couple of members of the POLO+10 team recently enjoyed taking part in a two-day weekend polo course for beginners. The aim of the course was to provide a comprehensive introduction to the sport with the opportunity for the participants to learn not only the practical skills but also the rules and tactics of the game.
The groups are deliberately small in number in order to optimise the time spent on practising and to ensure everyone receives feedback and specific advice on how to improve their own polo. The course was lead by Tim Ward, a professional polo player and coach from England. He currently has a handicap of +4 and is also a fully qualified HPA (Hurlingham Polo Association) Club Coach.
The pony and its tack are such an integral part in this sport that the participants were all asked to tack up and un-tack their own ponies during the course of the weekend. Tim used this as the starting point of the course and brought a pony into the yard in order to explain the polo specific tack and necessary steps for tacking up correctly.
Tacking Up:

To begin with, it is important to give the horse a good brush. This is not only a good opportunity to check the pony over properly and to make sure everything is ok, it also gets rid of any leftover dried sweat from the ponies coat and ensures that the pony will look smart and presentable, regardless of whether you are playing a tournament or just stick and balling.
The next task is to pick out the pony’s hooves and remove any clumps of dirt or small stones, which could potentially cause injury.
Next Tim explained that there are two main types of bridle used in polo: a Pelham and a Gag. It is customary in polo to always use double reins, both for chukkas and tournaments. This increases the accuracy when signalling to the pony. Polo ponies are trained to neck rein and the use of two reins on the pressure points in the neck makes the commands much clearer and gives the rider more leverage for stopping at speed. In addition to this, some players also choose to play with draw reins, which are fed through the snaffle rings on the bridle and then connected to the saddle.
A Pelham includes a curb chain, which applies pressure at the back of the jaw adding effect to the bit when the curb rein is pulled back. The curb chain should lie flat against the jaw and therefore must be untwisted before hooking it back on to the curb hook. Polo bridles also feature a standing martingale, which stops the pony’s head from flying up too high when playing.
Two participants were asked to put the bridle and the saddle on the pony during the demonstration, allowing Tim to explain the correct positioning of these pieces of tack. The saddles used for polo are usually English in style and do not have knee rolls, therefore allowing the player more mobility. The saddle also sits relatively far forward on the pony’s back in comparison to other equestrian disciplines.
 Bandages were the next item on the list of tack and must be used on all four legs for tournaments. Tim demonstrated how these were best put on the pony and explained that everyone usually develops a slightly different method of doing so. Bandages tend to sit just under the knee and run down to just below the fetlock. It is important that the bandage is wrapped down the leg smoothly and with consistent tension. In case anything is twisted or applied incorrectly, the bandage could do more harm than good. In addition to bandages, protector boots are often placed over the bandage to provide extra protection to this important part of a polo pony.
Studs should also be used for tournaments and chukkas, Tim recommends to use them every time when playing chukkas or tournaments in Northern Europe where pitches are more slippery due to the weather conditions. In order to provide a little more grip when stopping or turning no more than one stud per back shoe is used. After removing dirt from the little hole at the back of the shoe, studs can easily be screwed into place. You must however remember to remove them again once you have finished playing.
 The final part of tacking up is making sure that the tail is put up. The tail should also be brushed out at the beginning to make it look tidy and to make it easier to plait and put up. There are two ways of doing this: for tournaments the tail is plaited all the way down and then folded over on itself along the tail bone and fastened with tape in 3 places. (left)
However for stick & balling or for club chukkas the Argentine knot (known by the Argentineans as the American knot) is more commonly used. Again, there are a number of different ways of fastening this. Here Tim demonstrated one of the methods:
 1. Split the tail into 3 sections ready to plait and leave out a long thin strand at the top and back of the tail for later.
2. Plait until you are approximately half way down the tail making sure that the plait is tight and then separate into just two equal sections from the three.
3. Pull the two sections up and around the tail just above the place where the plait starts, bringing the sections back to the front of the tail.
4. Tie them into a simple knot, then simply twist them together into one section and fold it in half.
5. Take the piece of hair that was left out at the beginning and hold the end of this around the loop which you have made.
6. Begin wrapping the loop with the long section making sure to hold the end of the tie piece to the loop until it is too tight.
7. If you are worried that this may come undone, you can always fold this section back through the pieces you used to wrap around the top of the plait.
8. Finally give it a little tug downwards to secure it!
Tacking up done, it was time to move on to the training part of the course.
 Both mornings of the course began with general polo riding and training outdoors. The group worked through a number of warm ups and exercises to practise stability and precision – the key components of polo riding. Exercises included riding in a line formation at various speeds and staying completely in sync, passing a ball along this line and riding without stirrups before work began on the five main aspects essential to polo riding: Half Seat, Stopping, Turning, Accelerating and Checking.
The key components of polo riding: Half Seat, Stopping, Turning, Accelerating and Checking
First Tim would always explain each action in detail and why it is important when playing polo. He then proceeded to demonstrate this before asking everyone to follow individually. Every participant then received constructive feedback on how they could improve their technique.
1. The Half Seat
This is absolutely vital in polo as it forms the platform from which you will hit any ball with any of the shots. In order to achieve the half seat position:
- keep your heels down to avoid your head bending down towards the horse’s neck
- toes must point forwards and feet must be behind the grim to ensure stability
- weight must be on the inside of the foot
- this creates a pyramid shape in the legs allowing the upper legs to grip and make the position that much more stable
- toes must also be in line so they are just behind the knees
In the half seat, the body should form a sort of ‘Z’ position with the centre of gravity going directly down through it. Even though this position will be slightly different for everyone, it is important not to round your back too much ending up with more of a ‘C’ position, which is not as stable and does not look as professional. It is essential for a polo player to really train this position as much as they can, because it forms the basis for increased mobility.
Exercises for the half seat included holding the position for a number of laps around cones at varying speeds.
Rising canter is also a part of this position and is used by all polo players. It would be extremely tiring to have to hold the half seat throughout an entire chukka or game and you are not really able to sit in the saddle when travelling with pace, so many players use the rising canter when approaching the ball before rising into the half seat to take their shot.
When playing polo or even just exercising polo ponies, the left hand holding the reins will always remain in the same position; roughly two inches above the neck of the pony. It should stay at this height no matter which of the five aspects of polo riding you are practising. At no point should the left hand rest on the pony’s neck.
2. Stopping
Tim explained that there are many different styles used when stopping. Tim’s preferred style incorporates the following steps:
- making sure heels are kept down
- hands are kept in the same position, 2 inches above the neck
- lean back slightly with your upper body, keeping your hand the same distance away from your chest as it had been when just riding along
- you should not place your weight fully on the pony’s back but just sit in the sadly lightly
- finally you should squeeze your legs just behind the girth at the same time as you start to lean back
Exercises: stopping up and down the exercise track at various intervals.
3. Turning
The key when turning the pony is to make sure you are looking in the direction that you want to go. This should be done with your eyes, moving your upper body and your hands in that direction, which in turn moves the horse. You then have to “Press the Buttons” as Tim Ward repeatedly said. These buttons are “spots” on the flank and neck of the pony. The reins press the point on the neck and using your outside leg on the outside flank you should be able to turn your pony with ease and quickly.
4. Accelerating
As with turning, the key here is to look where you want to go. Many people look down at their hands or the pony’s neck rather than in the direction they wish to travel and find they do not go where they intended. Again, the rider is to squeeze on the “Button” on the flanks of the pony and move their hand forward slightly to signal acceleration. However, leaning forwards is not needed when accelerating as it can prevent you from looking clearly in the direction you wish to go.
Exercises for turning and accelerating included; accelerating up the track, stopping dead, moving backwards two steps before turning quickly and accelerating back down the track. Additionally, pretending to be in the centre of a giant clock and having to listen out for the numbers around the face and accelerating towards them before turning and heading to the next instructed number.
5. Checking
Checking is essentially a half halt. Tim explained it well: it is like going down a gear from a faster pace to a slightly slower one. This is a crucial part of polo as it allows the player time to prepare for and hit a much more accurate shot. Ultimately checking involves ‘compressing a spring’ otherwise explained as gathering the pony together to allow the rider more time to take a shot or gain full control of his speed again. This is done similarly to a stop but not leaning your weight back so much, as a check is a much faster action.
After an hour of general riding practise, it was time to change ponies and move on to some stick work. A combination of work in the indoor school as well as outdoors was used to train and practise shots. Training progressed over the course of the weekend from practising the offside fore- & backhand shots on the first morning, to cut & pull shots, the importance of a 2nd swing and finally nearside fore- & backhands.
Exercises for the morning stick work sessions included: relays, passing and goal scoring as well as short instructional chukkas.
Even lunchtime was used to educate the course participants on all things polo. Rules and strategies were the order of the day at the lunch table. Topics covered included: Line of the Ball, the Right of Way, Lineouts and the many different swings used by polo players.
The different shots in Polo
There are a total of 16 different shots in Polo; the copy of a diagram which Tim drew for the group at the Sunday lunch rules and strategies session explains these in the best way (see below). The annotations name each of these shots.

- forehand
- tap
- half shot
- full shot
- under the neck shot
- cut shot
- pull shot
- backhand
- open backhand
- backhand (straight)
- tail backhand
When taking any of these shots, it is crucial that the player is in the half seat position. For the offside shots the upper body twists to the right and the player’s head should line up directly over the ball. For the nearside shots, the upper body must twist a little further, this time to the left, therefore requiring a little more grip from the legs on the saddle to increase stability.
Hooking & Riding Off
Hooking – A player may hook another player’s stick in order to stop them hitting a shot. However, hooks must remain below shoulder height and they must occur on the same side of the pony; a player cannot reach around another pony in order to hook a stick. A hook is ultimately a block of the opponents stick; slash hooks (hooking with force) are not allowed.
Riding Off – This must be done shoulder to shoulder and a ride off should start at no greater an angle than 45 degrees. In addition, the riders must be going at the same speed; if another player comes up behind and attempts to ride off from that position, it will result in a foul. In order to be successful in a ride-off, the key is to get your knee in front of that of your opponent.
After lunch these rules and strategies would then be put into practise in further exercises or instructional chukkas. The same two ponies from the morning would be used for two further hours of instruction. The afternoon sessions involved a mixture of stick & ball (practising both offside and nearside shots) and instructional chukkas.
Exercises in the afternoon included; cut and pull shots around a diamond formation of cones, diamond formation exercises from a hit in to the goal at the other end of the pitch and re-enacting the LOB & ROW diagram with the introduction and practice of hooks and ride-offs.
The 2nd Swing
The idea of the 2nd swing in polo was also introduced during stick and balling in the afternoon sessions. Tim explained that after reaching a -1 or 0 goal handicap, in order to progress it is essential to introduce the 2nd swing after each shot. The second swing follows on straight after a full shot, but you take the handle of the stick up higher towards your ear and let the stick swing another 360 degrees by using your wrist. This action allows players to hit much harder, longer shots and allows the stick to flow after these, avoiding injuries.
The Diamond Formation
This is an essential tactic used in Polo. In order to minimise the chances of the opposing team gaining possession of the ball, the attacking side will start their hit in from the back line by playing the ball out towards the boards rather than up the middle of the pitch. Ultimately the diamond formation works well in both directions, towards the left and right boards, but the right is preferable as the opposition have less possibilities of taking possession of the ball.
Line of the Ball & Right of Way
This was explained very clearly by Tim’s diagram drawing (see diagram below). The page was split into quarters with the line of the ball and the right of way going down the centre of the page (pitch). The line of the ball is the path the ball takes but is not limited by a start and end point. The right of way belongs to the player who has established themselves on the right of way the fastest, or who has obtained it through the use of a safe ride off. No player may block or cross the ROW where there is a potential risk of collision or danger to other players or ponies.
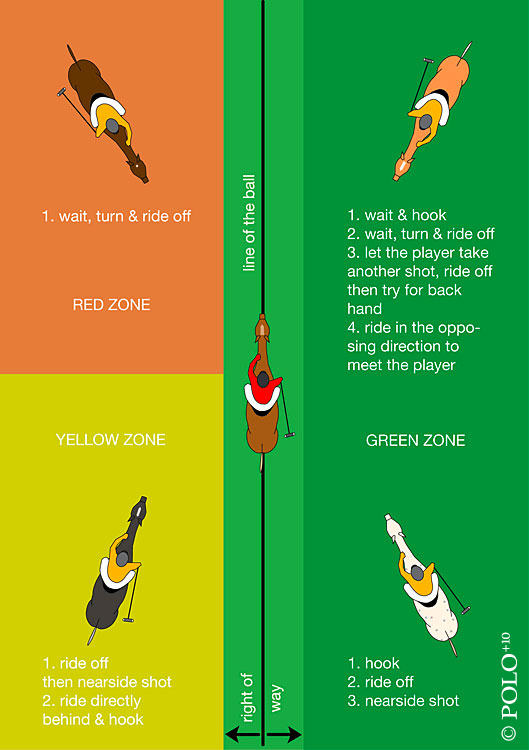
Further information and illustrations about Line of the Ball and Right of Way, as well as about fouls and right & wrong plays can be found here: → please click here
The second diagram (see below) shows how the players in each team should line up for the throw ins. These occur at the beginning of the match and after each goal as well as at certain other points during the game. The umpire will either stand facing the boards or into the pitch and the players will line up from 1 to 4. The number 4 may also choose to stand apart from the line up already in position to return to their defensive position. This is demonstrated in the diagram by the additional slightly faded number 4 player.
The final session on Sunday afternoon turned out to be a fun ‘end of course chukka’ – a marvellous opportunity to show all that you had learnt over the weekend. The improvements were truly astonishing!
These quick improvements were only possible due to the absolutely fantastic explanations, demonstrations and feedback, which everyone received from Tim Ward. The participants were soon clamouring to take part in the next available course and even enquiring as to the possibility of joining club chukkas to help further improve their game! The structure of the course was superb – having the opportunity to ride all day on two different ponies and having the time to really work on all the topics covered in the sessions. The variety of riding practice, stick and ball and instructional chukkas, both indoors and outdoors, also enriched the learning process. The ponies supplied by the club were particularly well trained, all providing an excellent and stable platform from which the participants could really practice and learn.
Gallery:
[nggallery id=391]


